 Biotope One A Study of Flora and Fauna
 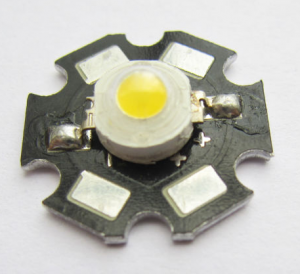 My journey into LED aquarium lighting started about two years ago when i decided to get a small tank for my desk. I got a small 5 gallon tank for the desk to look at instead of a screen all day to break the monotony. It had a cheap, and I mean cheap, little LED light which I hated. I decided to retrofit it myself and make it brighter. That is what started it all. I got more tanks and lighting them with LEDs just seemed the way to go. I experimented with different colors and sizes to find what worked best for what i was keeping.
I know they make tons of pre-made LED fixtures but they cost way too much and many have too many bells and whistles for my use. So I made simple working lights and some worked better than others. Now I have the spectrum pretty much dialed in that I like and have been making retrofits since.
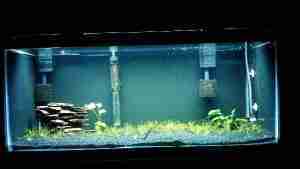 Before the LED DIY Lights were installed.
I will explain my 30 inch hood retrofit build with LEDs as a light source. On this build I used an old fluorescent 20 watt hood and gutted out all the insides. I bought a piece of aluminum plate about 1/8th inch thick from a sheet metal shop. It was around $5 dollars as scrap. I located the positions of the LEDs and then mounted them with heat sink grease and flat head screws.
I connected them in a series parallel circuit. Thus giving me 11 series circuits each consisting of 4 LEDs. All but the red LEDs are 3.4 – 3.8 volt. So by putting them in a series I get a voltage drop of roughly 13.6 volts. The power supply is rated at 12 volts. Each series of four where there is a red LED I included a 1 ohm 1 watt resister to balance it to the other series as red LEDs only draw 2.4 – 2.8 volts. This keeps the current draw in each series equal.
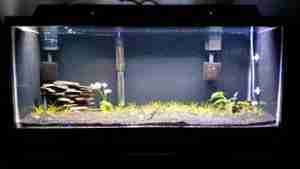 Much better lighting after the LED lights were installed.
So in this configuration I’m under driving the LEDs which is fine for this application. It also serves to lower the heat dissipation from the LEDs and reduces the need for larger heat sinks and fans.
I used the existing posts in the old hood to mount the new array on thus keeping it suspended in the middle of the hood where it can vent out from the top and get circulation around the plate. The plate still gets warm.
In this arrangement it pulls approximately 4 amps with the power supply adjusted to 12.5 volts. Most of the time I would only use 3 LEDs in a series and use a current limiting resistor as the 4th LED. In this application I was able to use 4.
 The LEDs are being soldered together to complete the circuit.
Lets look at the HOW and WHY on LEDs
Look at LEDs as a light bulb, each needs x amount of voltage to light. For this example we will say each led needs 3 volts to turn on and 400 ma, so with 3 volts I can light one led and its current draw will be 400 ma. at about basically the equivalent of two 1.5 volt batteries.
Now if i want to add a second LED, it can be added in parallel and still the circuit will draw 3 volts but now it wants 800 ma. (400 ma x 2 because there are now two LEDs). The batteries are going to drain much faster at about twice the rate. We can continue to add them in parallel and only increase our amp draw. 3v high amp power supplies are hard to come by and get costly. We can go the other direction and add them in a series so each one in the series wants 3v, so 2 will be 6 volts, 3 would be 9 volts, just as if we were putting batteries in series.
When added in a series our current draw will still only be 400 ma through the circuit. Looking at your source voltage will tell you how many you can add in a series. You can then take those series and put them in parallel and start to multiply your amps by the number of series you have. and thats how you would rate your supply.
To explain this further, for every series you would have to supply 400ma for it. LEDs are not a constant and most have a range in which they operate. Most white color lights are around 3.2 -3.8 volts with red for plants around 2.4-2.8 @ 700 ma. When you design your circuit you have to calculate for the voltage differences. Remember that the more voltage that is applied, the more amps they will draw, and thus the hotter they get.
 Lit up LEDs during premounting check.
Let’s say we have a 12 volt 10 amp power supply. We want to use 3 LEDs rated at 3.4-3.8 volts. If we calculate for the higher end we know it will draw more current and produce more heat. By selecting a mid range voltage we will not be as bright but we wont develop as much heat. We do not lose a lot of brightness most of the time to the naked eye as it cant be seen. So we take the average of the range at 3.6 volts x 3 which equals 10.8 volts. We now we have 1.2 volts left over which we could give back to the LEDs and drive them at full voltage but then making a lot more heat and the need for bigger heat sinks and cost or we can use a resistor to shunt this extra voltage.
Now that we know we have 1.2 volts left, we know we want about 400 ma of current so we can find our resistor by using a simple formula. Volts divided by Amps equals resistance (v/a=r). We know the volts are 1.2, and the amps are 400 ma, which leaves us 3 ohms.
If you take volts times amps it equals watts (v*a=w) or 1.2 x .4 = .48 watts. With .48 watts this shows we need a 3 ohm half watt resistor to complete this circuit. You can also use 4 LEDs and they will light but your voltage will be less across each LED and the brightness will be affected. If you have the ability to adjust the output voltage on your power supply you can adjust it to match the number of LEDs without a resistor and/or adding another LED.
The number of LEDs you can put in a series string is all dependent on the power supply voltage. There is no limit to the amount you can supply. 24 volts would get you more in a series than 12 volts and thus 9 volts would get you less in series.
Lets see the HOW and WHY on Power Supply
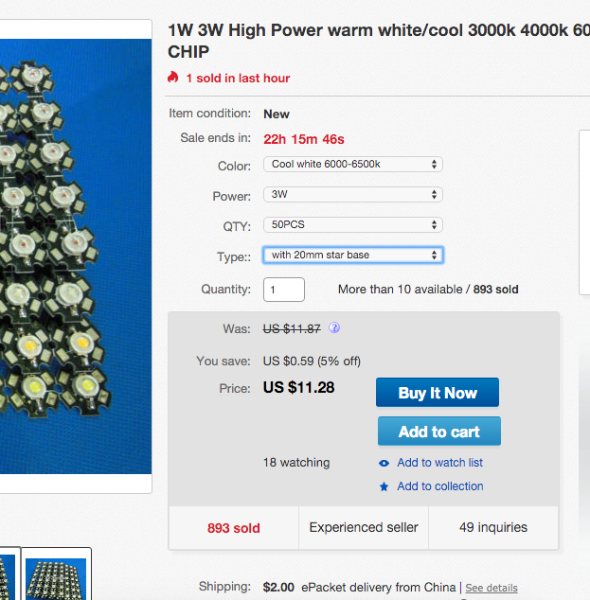 Inexpensive LEDs from Ebay 50 pcs for $14.00 delivered.
It’s based on how many LEDs you are going to use. Most supplies for LEDs are 12v standard. By using that voltage and then figuring how many LEDs you’re going to place in your hood along with what current you want to run them at you can figure your amp draw.
If I were going to make a hood with 21 LEDs in, it as an example, I know that i will most likely be placing 3 in a series and making 7 sets of them. If I was going to run them at full power 700 ma i would have 700ma x 7 or 4.9 amps. I would need a power supply that would give me 12v and at least 5 amps. More can not hurt.
Now our calculations for the resistor would be based on 700 ma not 400 ma like the smaller version. That 1.2 volts would be 1.2/.7 =1.71 or rounded up at 2 ohms. The wattage would be .84 watts or rounded up to a 1 watt resistor.
If you where going to run it full open at maximum values instead of the middle average you would get 11.4 volts across the resistors and have .6 volts leftover to shunt. We would see. .6/.7=.8 ohms or 1 ohm at .6*.7= .5 watts.. so what determines the power supply is how much your circuit is going to pull over all which is calculated by your series/parallel circuit.
The term ‘driver’ is often hear when referencing LEDs. A ‘driver’ is the power supply. The reason driver has come into term is that it is the power used to drive an led. When you see driver its referring to the power supply. There are different types of power supplies. The most common and most often recommended is a switching power supply.
A switching power supply regulates itself based on the load it is presented with. The higher the load the more it will give up to its maximum output. Switching supplies often have an over load circuit that if the load is pulling too much current it will shut down, until reset or the problem is fixed, saving its self and your circuit. There is also a static supply will give you, say, 12 volts and as the load increases the voltage will drop and can go as low as 9 volts.
Then you have controls where a program is created and sent to an circuit like an Arduino or other created by the manufacturer that allows to program light cycles and brightness. These do not regulate the voltage to make the led seem dimmer. It works by adjusting the brightness by turning it on and off in pulses which we can not see other than it looks dimmer. This method of controlling the intensity is called PWM (pulse width modulation). This is really a cool feature and a lot can be done with it but thats all on the programmers and higher level lighting than just making an off and on led fixture.
Mounting up the LEDs
Now that you have figured out how many LEDs you are going to use and what power supply is needed you must decide what kind of light housing you are going to use. For this lighting project I decided to use the old 30 inch fluorescent hood because that is what I had on hand. After gutting the old components out I cut the piece of aluminum sheet so that it fit the posts and I could ad my LEDs to it. It will also act as a heat sink to dissipate heat from the LEDs.
Housing choices for your lighting project.
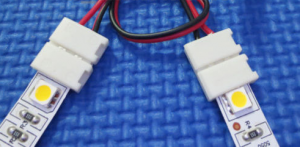 Strip LEDs can also be used solderless by using these special connectors.
For housings it is really up to your imagination and what you can scrounge or find. You can convert almost anything into a hood. I find striping out an old hood is the easiest. it already fits the tank and wired for the most part.. But I have used plastic rain gutter, made custom acrylic hoods and even just mounted them to the top of canopies.
One thing we have been talking about is the 1watt and 3 watt style.. they come in a wide variety of options you have single LEDs, strip LEDs and strip mounted. There’s even some that come like a screw in light bulb that you just have to screw into an old style light hood.
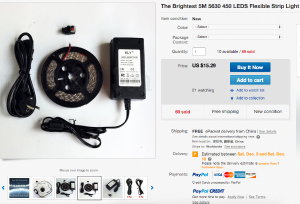 Complete LED 12 volt kit in strip form. Connectors can be used to avoid soldering many types.
If I’m doing smaller tanks or even some larger I can also use strip LEDs as an option. Strip LEDs are adhesive backed and come on a roll. These do great for tight spaces and small hoods especially. They are already usually designed for 12v operation and I have a few hoods where I have used these with good results.
Some of the strip mounted LEDs are already wired so you just have to add the power soldering instead of soldering all the LEDs together. There are also a solderless connector available that you can use to connect a wire to the LED to avoid soldering even the power. In the strip lights the 505 and 5630 are ok to use in 6500K and a straight 15 ft you can cut down into smaller runs and place side by side. This way you can use a whole kit and still not have to solder anything.
Consider either the LEDs that you are going to use first or look at the hood you are going to use first. It may be possible to design for the optimum setup if you take the time to figure out if you want to use the strip LEDs or the larger LEDs with higher output. Put some forethought into the light first before stuffing lights into a hood.
Heat sinks and controlling heat in your hood or canopy.
The side effect of creating light is heat, and heat needs to be addressed as it needs to be managed and dealt with. As far as heat sinks go I wish i had a formula and I’m sure there is one out there but for the most part lets take the 3 watt star heat sinked led the ones I use in the last build. Just from playing around with them I know by reducing the voltage and current I can get them to be fairly bright and yet only warm to the touch so in that case no need for extra heat sinking. Make sure there is some venting someone to help keep them cool.
If you I were trying to get the most I can and if I want to run them at their maximum I know it will get hot. Therefore I try to match a heat sink or a heat sink bar that will allow a good amount of heat to escape. These heat sinks look like the heat sink on the processor of your computer. A single 3 watt LED would need a heat sink of about 2 x the size squared with some type of fin to dissipate heat. If I have a lot of LEDs running maximum in an array I will add a fan.
LED choice for plant light color ranges.
Now on to something about LED color. Plants for the most part only use the red and blues in the light spectrum to thrive. That’s why plant bulbs always have a pink hue to them. Like any other variety of bulb whether it be fluorescent or metal halide 6500k is a plant and viewers best friend. This range gives off spikes in the 420-460nm range for red color and also in the 600 blue range for the plants yet has enough white that we can see the tank and inhabitants in a natural light that resembles daylight.
Usually when I make an LED array I use a 6500k LED as the primary bulb thus most of them are 6500k color and the LED range dictates the colors you will see and your plants will use. Also I may use 10,000k scattered throughout the array. To complement a heavily planted tank that I may use 10,000K LEDs I also scatter blue and red throughout. The number of 10,000k and red and blue are based on the size of the array.
I have been experimenting with the new plant LEDs which cover heavy in the 400 nm and 600-800 nm ranges and they produce a really nice pink bulb. Added some of those into the mix I have seen a vast improvement on the plants reaction to light some with very quick pearling following.
With salt water we have a different spectrum to achieve that is in a much higher range of blue. These actinic ranges are up higher at 20,000K and they tend to look very blue. I have not played much in that area as of yet but corals appreciate that spectrum and I may do some experimenting with that one day.
LED lighting doesn’t have to cost hundreds and hundreds of dollars for a light that provides plenty of light int eh proper range. You can build one with a small variety of tools that many people already have laying around. Repurposing old hoods is a great way to start and you are only limited by largely your imagination. LEDs are available inexpensively and are readily available. Your plants will love it.
Written by Andrew Newcomer
Photos courtesy Andrew Newcomer